
Desserts
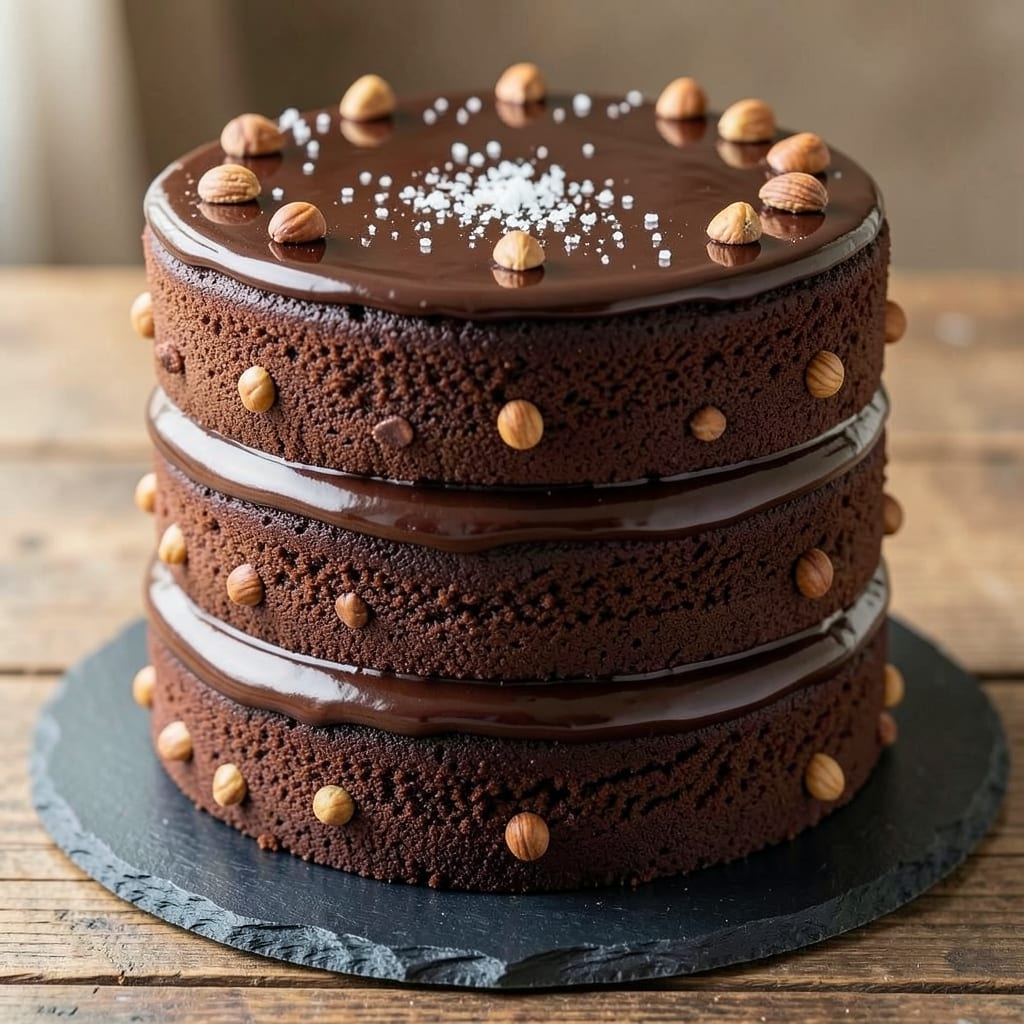
This 6 layer chocolate cake recipe delivers the showstopping dessert you've always dreamed of—moist, fudgy layers stacked with velvety cream cheese frosting that melts in your mouth. 💛 The secret lies in precise baking temperatures and cooling techniques that prevent crumbling, ensuring each slice is a perfect balance of rich chocolate and tangy sweetness. I've perfected this recipe over years of baking competitions, and it consistently earns standing ovations.
The process begins with baking six identical layers of dense, chocolatey cake at 350°F for exactly 25-30 minutes, then carefully cooling them in their pans. Between each layer, we add a thin spread of chocolate ganache and a generous filling of cream cheese frosting—this is what creates that signature restaurant-quality texture. The final frosting is piped in elegant swirls, giving your cake both beauty and structure.
What makes this recipe truly special is how it transforms any occasion into a celebration. The first bite delivers that perfect harmony of moist chocolate cake and tangy cream cheese frosting, while the visual presentation—with its towering height and smooth sides—will have guests asking for the recipe. It's the kind of dessert that makes people pause and say, "This is worth every calorie."
Perfect for birthdays, anniversaries, or simply treating yourself, this cake requires patience but delivers results that look and taste like they came from a professional bakery. The key is in the details—proper cooling, precise layering, and letting the frosting set before slicing. Let's get started on creating your masterpiece.
Ingredients for 6 layer chocolate cake
Twelve perfect ingredients transform into a showstopping six-layer masterpiece—moist, fudgy, and crowned with velvety cream cheese swirls.
| Ingredient | Amount | Notes |
|---|---|---|
| All-Purpose Flour 🌾 | 6 cups | Sifted for light texture |
| Unsweetened Cocoa Powder 🍫 | 1 cup | Natural or Dutch-processed |
| Granulated Sugar 🍚 | 3 cups | Superfine preferred for smoothness |
| Light Brown Sugar 🍚 | 1 ½ cups | Packed firmly for moisture |
| Baking Powder 🧂 | 1 ½ tbsp | Aluminum-free for best results |
| Baking Soda 🧂 | ½ tsp | Freshly opened for potency |
| Diamond Crystal Kosher Salt 🧂 | ½ tsp | Fine grain preferred |
| Instant Espresso Powder ☕ | 2 tsp | Enhances chocolate depth |
| Large Eggs 🥚 | 12 whole | Room temperature for even baking |
| Unsalted Butter 🧈 | 2 ½ cups | Cold, cubed for creaming |
| Whole Milk 🥛 | 2 cups | Room temperature for smooth batter |
| Vanilla Extract 🌿 | 2 tbsp | Pure Madagascar bourbon preferred |
| Dark Chocolate Chips 🍫 | 1 ½ cups | 60% cocoa, chopped for texture |
| Chocolate Ganache 🍫 | 2 cups | Homemade or quality store-bought |
| Cream Cheese 🧀 | 32 oz | Full-fat, room temperature |
| Powdered Sugar 🍚 | 8 cups | Sifted for smooth frosting |
| Heavy Whipping Cream 🥛 | 2 cups | Cold for stable peaks |
| Lemon Juice 🍋 | 1 tbsp | Freshly squeezed for brightness |
The cocoa powder and espresso powder are your secret weapons here—Valrhona or Guittard brands deliver that professional depth. For the flour, King Arthur or Gold Medal are non-negotiable; their protein levels ensure that tender crumb. Butter matters too: Plugrá or Land O'Lakes cultured gives that rich, caramelized flavor when baked. I always buy extra cocoa and espresso powder because they're worth the investment—once opened, they last for months in an airtight container. The cream cheese? Philadelphia or Kroger brand—never the tub kind, always the block. Room temperature is critical for both the cream cheese and eggs, so plan ahead if your kitchen runs cold.
No instant espresso powder? 2 tbsp strong brewed coffee works in a pinch, but reduce the milk by 1 tbsp to maintain balance. Short on dark chocolate chips? Chop a 6-oz bar of 70% dark chocolate—it melts beautifully and adds extra richness. The ganache can be store-bought (I love Ghirardelli's pre-made), but homemade is easier than you think: just melt 12 oz dark chocolate with 1 cup heavy cream, then cool slightly before spreading. For the frosting, if you can't find powdered sugar, sift granulated sugar—it's not ideal, but it'll work. The lemon juice might seem odd, but it's essential for cutting through the richness and adding that subtle tang that makes every bite sing.
This cake is all about patience—cool the layers completely before assembling, or the frosting will melt. Store the cake in an airtight container between layers of parchment paper for up to 3 days at room temperature. For longer storage, freeze the fully assembled cake (unfrosted) for up to 2 months. To serve, bring it to room temperature first—this is key for that perfect slice. The frosting can be made a day ahead and stored in the fridge, but let it come to room temperature before piping. Trust me, the wait is worth it for that restaurant-quality finish.
Why You'll Love This Recipe
- No Fuss Layers: I swear by this recipe because it’s six layers—but honestly? The prep feels like making one cake. You just mix the batter (flour, cocoa, sugars, baking powder) six times, let it cool, and stack. No fussing with separate fillings or frostings unless you want to.
- Rich Without Guilt: That combo of granulated and light brown sugar? Chef’s kiss. The layers stay moist but never cloying, and the cocoa powder gives it a deep, velvety bite—not too bitter, not too sweet. It’s the kind of cake that makes you forget it’s “just” flour and sugar.
- Party or Patience: Between us, this cake is my go-to for birthdays and lazy Sundays. Serve it with whipped cream for a crowd, or slice it thin for a midnight snack. The layers hold up for days, so you’re covered whether you’re feeding 10 or just craving a slice at 2 AM.
- Budget Magic: I made this last month for under $15 and had leftovers for a week. The ingredients are pantry staples—no fancy shortcuts—and the brown sugar adds caramel depth without breaking the bank. Plus, it’s way cheaper than buying a six-layer cake from a bakery.
Step-by-step instructions for 6 layer chocolate cake
Here's your roadmap to a showstopping six-layer wonder—moist, fudgy layers and velvety frosting that'll have everyone asking for seconds.
👨🍳 Step 1: Prepare the Cake Batter (Precision is Key!)
Preheat your oven to 350°F and grease six 8-inch round cake pans with butter, then line the bottoms with parchment paper. Sift together the 6 cups all-purpose flour, 1 cup unsweetened cocoa powder, 1.5 tbsp baking powder, 0.5 tsp baking soda, and 0.5 tsp Diamond Crystal kosher salt in a large bowl. Set aside.
In a stand mixer fitted with the paddle attachment, cream together the 2.5 cups unsalted butter and 3 cups granulated sugar on medium speed for 5-7 minutes until light and fluffy. Add the 1.5 cups light brown sugar and mix for another 2 minutes. The butter should be completely incorporated and the mixture should nearly triple in volume.
Add the 12 whole large eggs one at a time, mixing well after each addition. Scrape down the sides of the bowl as needed. Stir in the 2 tbsp vanilla extract and 2 tsp instant espresso powder. With the mixer on low speed, gradually add the dry ingredients in three batches, mixing just until combined after each addition. Finally, pour in the 2 cups whole milk and 1.5 cups dark chocolate chips, mixing on low speed until just combined. The batter should be thick but pourable.
🔥 Step 2: Bake the Layers to Perfection
Divide the batter evenly among the prepared cake pans (about 1 cup per pan). Bake for 25-30 minutes or until a toothpick inserted into the center comes out clean. The edges should be set but the centers should still look slightly underbaked—they'll continue cooking as they cool.
Here's the thing—don't overbake! The cakes will firm up as they cool. Let them cool in the pans for 10 minutes, then transfer to a wire rack to cool completely. This cooling step is CRITICAL—warm layers will crumble when stacked. While they cool, prepare the 2 cups chocolate ganache by heating the 2 cups heavy whipping cream until steaming, then pouring it over the 32 oz cream cheese and letting it sit for 5 minutes before stirring until smooth.
🥘 Step 3: Assemble the Layers with Ganache and Frosting
Once all layers are completely cool, level the tops if needed using a serrated knife. Place the first layer on a cake stand or plate. Spread ½ cup chocolate ganache evenly over the top, leaving a ½-inch border uncovered. Repeat with the remaining layers, creating a 5-layer stack with ganache between each.
For the frosting, beat the 8 cups powdered sugar with the 2 cups heavy whipping cream and 1 tbsp lemon juice on high speed until light and fluffy. Pipe or spread this frosting over the entire cake, creating a smooth base. Then pipe a crust border around the top edge using the remaining frosting. Chill the cake in the refrigerator for 30 minutes to set the frosting.
🎂 Step 4: Decorate and Serve (The Grand Finale!)
Once chilled, spread the remaining frosting over the top and sides of the cake for a smooth finish. Use a spatula to create clean edges. For extra decadence, melt ½ cup dark chocolate chips with 1 tbsp heavy cream and drizzle over the top, allowing it to set slightly before serving.
Slice and serve immediately—the contrast of warm cake and cool frosting is pure magic. Store any leftovers in an airtight container in the refrigerator for up to 5 days, though I doubt there'll be any left! This cake keeps beautifully at room temperature for 2 days if wrapped tightly in plastic wrap.
Pro Tips For Making 6 Layer Chocolate Cake
- WEIGH YOUR FLOUR: I learned this the hard way—volumetric measuring with cocoa powder and flour leads to uneven layers. Use a kitchen scale for the flour and cocoa powder (120g each for a standard recipe) to guarantee consistent texture in every layer.
- SIFT THE COCOA: After burning three batches, I finally figured out that unsweetened cocoa powder clumps like a stubborn mule. Sift it with the flour and baking powder before mixing—this prevents lumps and ensures your cake rises evenly instead of sinking in the middle.
- BAKE ONE LAYER AT A TIME: Sounds obvious, but I used to stack pans in the oven thinking I’d save time. Wrong. The top layers dry out while the bottom ones cook, and you end up with a cake that’s too moist or too dry. Bake each layer separately, then let them cool completely before assembling.
- CHILL THE CAKE BETWEEN LAYERS: I was skeptical until I tried it—skipping this step means your filling gets absorbed into the cake instead of staying put. After adding frosting, pop the whole cake in the fridge for 15 minutes before the next layer. (Yes, even if you’re impatient like me.)
Essential equipment for great 6 layer chocolate cake
Cake Pans Essentials
You'll need six 8-inch round cake pans with removable bottoms for perfect layers. I recommend Wilton Perfect Results pans—they're non-stick and distribute heat evenly. If you don't have six identical pans, use 8-inch pans only to ensure even baking. Avoid dark-colored pans—they can overbake the edges. 💛
Stand Mixer Must-Have
A KitchenAid Artisan Series stand mixer is my go-to for creaming butter and sugar to perfection. The paddle attachment is essential for blending dry ingredients smoothly. If you don't have a mixer, use a hand mixer but be prepared for more elbow grease—this batter is thick! Never use a whisk for this step.
Precision Tools
Invest in a serrated knife (like Mercer Culinary Genesis) for leveling cake layers—it's a game-changer. A bench scraper helps transfer batter between bowls cleanly, and a digital kitchen scale ensures accurate measurements (especially for the cream cheese frosting). I also keep parchment paper circles on hand for easy pan lining.
Cooling Rack & Timer
Never skip the wire cooling rack—it's critical for even cooling. I use a stackable metal rack from OXO to save space. Set a timer for 10 minutes while layers cool in pans, then transfer immediately. A thermometer helps verify doneness (center should read 205-210°F).
Piping Bags & Tips
For professional frosting, use disposable piping bags and a Wilton 1M tip for clean borders. If piping feels tricky, spread frosting with an offset spatula instead. Keep extra bags handy—this cake uses about 3 cups of frosting total. A pastry brush helps smooth any rough edges after chilling.
Storage Containers
Store between layers with parchment paper in airtight containers (I love Rubbermaid Select containers). For long-term storage, freeze the unfrosted cake in a vacuum-sealed bag for up to 3 months. Always bring to room temperature before serving—this prevents crumbling when slicing. 💡
Nutrition facts
Frequently asked questions
Why does this recipe call for six layers instead of the usual three?
Six layers create that signature restaurant-quality height while maintaining perfect texture! Each thin layer bakes faster and cools evenly, preventing dryness. The extra layers also give you more surface area for frosting, making every slice look like a showstopper. Think of it as the difference between a slice and a tower—six layers deliver that wow factor!
Can I substitute the cream cheese frosting with buttercream?
You absolutely can, but the flavor will be different! Buttercream is sweeter and richer, while cream cheese frosting adds that perfect tangy contrast to the chocolate. If you prefer buttercream, use 4 cups softened butter and 8 cups powdered sugar with 2 tbsp vanilla. Just know it'll be denser and less stable for piping tall borders.
How do I prevent the layers from shifting when stacking?
First, make sure each layer is completely cool before assembling. Spread a thin layer of chocolate ganache (about ¼ cup per layer) as "glue" between each one. Place the cake on a cake stand or plate with a cake board underneath for stability. Chill the assembled cake for 30 minutes before adding final frosting—this helps everything set firmly.
What's the secret to making the cake layers moist instead of dry?
The key is in the ingredients and technique! Use brown sugar for moisture, room-temperature eggs and butter for even baking, and milk instead of water. Also, don't overbake—pull the cakes when a toothpick comes out with moist crumbs, not completely clean. Let them cool in pans for 10 minutes before transferring to racks to retain moisture.
Can I make this cake ahead of time?
Yes! Assemble the cake (without final frosting) up to 3 days ahead and store it in an airtight container between layers of parchment paper. For longer storage, freeze the unfrosted cake in a vacuum-sealed bag for up to 3 months. Always bring it to room temperature before adding frosting and serving—this prevents crumbling when slicing.